
Getting started with Azure Red Hat OpenShift
Azure Red Hat OpenShift was announced during last year Red Hat Summit, since then the service has been first in private preview and then during this year Red Hat Summit the service was declared GA.
After the GA however not every Microsoft and Red Hat customer was able to freely try it in the classic pay as yo go model, instead there was a requirement to reserve four application nodes up-front for the first cluster. However this requirement has been finally lifted during Microsoft Ignite and from now on you can deploy Azure Red Hat OpenShift, or ARO for short, in a PAYG fashion like it should be with any cloud service.
With this in mind I am going to describe the process to deploy your first ARO cluster.
Prerequisites
Before deploying a cluster we will need to meet several requirements in order to integrate the authentication with Azure Active Directory. All the processes for the prerequisites using Azure Portal are very well described in ARO documentation here, so instead of repeating that part I will instead demonstrate the process using Azure CLI.
We will need to perform two distinct operations:
- Create an Azure AD security group
- Create an Azure AD app registration
Create an Azure AD security group
First create the Azure AD security group
$ az ad group create --display-name aro-group --mail-nickname aro-group -o json
{
  "deletionTimestamp": null,
  "description": null,
  "dirSyncEnabled": null,
  "displayName": "aro-group",
  "lastDirSyncTime": null,
  "mail": null,
  "mailEnabled": false,
  "mailNickname": "aro-group",
  "objectId": "4f2aefef-a111-4f84-b980-99c989a4e0cc",
  "objectType": "Group",
  "odata.metadata": "https://graph.windows.net/b40a365a-9f29-4480-b1f9-28f9179421de/$metadata#directoryObjects/@Element",
  "odata.type": "Microsoft.DirectoryServices.Group",
  "onPremisesDomainName": null,
  "onPremisesNetBiosName": null,
  "onPremisesSamAccountName": null,
  "onPremisesSecurityIdentifier": null,
  "provisioningErrors": [],
  "proxyAddresses": [],
  "securityEnabled": true
}
With the group created take note of the objectId property, we will need later to create the cluster. Next step is to add the accounts fo the future ARO administrators to this group, in my case I will add a custom account I created in my tenant.
$ az ad group member add --group aro-group --member-id 804fb062-a879-4e72-aaca-8be50e6dc49a
$ az ad group member list --group aro-group --query '[].{Name:displayName, NickName:mailNickname, Id:objectId}' -o json
[
  {
    "Id": "804fb062-a879-4e72-aaca-8be50e6dc49a",
    "Name": "ARO Admin",
    "NickName": "aroadmin"
  }
]
Create an Azure AD app
To be able to integrate our cluster with Azure Active Directory we will need to create an Azure AD application.
$ appId=$(az ad app create --display-name aro-aad --query appId -o tsv)
$ echo $appId
57887cd0-868b-4e0d-88a7-519a0ad590cf
Confgure the application
With our application created we need to configure it, first set the owner which in my case is the aroadmin user.
$ az ad app owner add --id $appId --owner-object-id 804fb062-a879-4e72-aaca-8be50e6dc49a
$ az ad app owner list --id $appId --query '[].{Name:displayName}' -o json
[
  {
    "Name": "ARO Admin"
  }
]
Next step is add the permissions to the specific Azure Active Directory Graph APIs. We need to add permissions for Directory.Read.All and User.Read. The first one is defined as an Application type and will allow the app to Read directory data. the second will be granted as Delegated and will enable the app to Sing in and read user profile
$ az ad app permission add --id $appId --api 00000002-0000-0000-c000-000000000000 --api-permissions 311a71cc-e848-46a1-bdf8-97ff7156d8e6=Scope 5778995a-e1bf-45b8-affa-663a9f3f4d04=Role
Lets dig a bit in the previous command options before we continue.
00000002-0000-0000-c000-000000000000represents Azure Active Directory Graph API311a71cc-e848-46a1-bdf8-97ff7156d8e6corresponds toUser.ReadAPI permission and theScopeoption indicates this would be a delegated permission.5778995a-e1bf-45b8-affa-663a9f3f4d04corresponds toDirectory.Read.Allpermission and theRoleoption tells Azure AD API this would be an application permission.
To finish the API permissions we need to grant admin consent for this application, in order to grant the consent you need to be the Azure AD admin or request an admin to do it.
$ az ad app permission admin-consent --id $appId
$ az ad app permission list --id $appId -o json
[
  {
    "additionalProperties": null,
    "expiryTime": "2020-05-15T16:17:56.6007636",
    "resourceAccess": [
      {
        "additionalProperties": null,
        "id": "311a71cc-e848-46a1-bdf8-97ff7156d8e6",
        "type": "Scope"
      },
      {
        "additionalProperties": null,
        "id": "5778995a-e1bf-45b8-affa-663a9f3f4d04",
        "type": "Role"
      }
    ],
    "resourceAppId": "00000002-0000-0000-c000-000000000000"
  }
]
Generate a secure password by any method and add as secret to the application.
$ az ad app update --id $appId --password <SUPER_SECRET_PASSWORD>
Finally update the application to disable implicit grant flow using ID Tokens.
az ad app update --id $appId --set oauth2AllowIdTokenImplicitFlow=false
There is one more setting to configure, the Redirect URI, but we cannot set it until the cluster is created.
Creating the cluster
Once all prerequisites are finished we can proceed with the cluster creation. Create a new resource group, although this resource group will not contain the resources of the cluster but I will explain thsi later.
$ az group create --name arorg --location westeurope
The paremeter needed for the create operation are:
- Cluster name.
- Resource group.
- Azure AD Application ID - The ID of the we created in the previous section.
- Azure AD Application secret - The application password we created.
- Azure AD Tenant ID - The Azure AD tenant ID the clsuter will be integrated with.
- Customer Admin Group ID - The ID of the Azure AD security group created before that includes all the admin accounts.
- Application Node count - By default is 4 but in my case I am deploying just two application nodes.
$ az openshift create -n aro-cl1 -g arorg -c 2 --aad-client-app-id $apId --aad-client-app-secret <SUPER_SECRET_PASSWORD> --aad-tenant-id b40a365a-9f29-4480-b1f9-2gf9179421de --customer-admin-group-id 4f2aefef-a111-4f84-b980-99c989a4e0cc -l westeurope
$ az openshift list
Name     Location    ResourceGroup    OpenShiftVersion    ProvisioningState    PublicHostname
-------  ----------  ---------------  ------------------  -------------------  ---------------------------------------------------
aro-cl1  westeurope  arorg            v3.11               Succeeded            openshift.3a298ccfc966456481fe.westeurope.azmosa.io
Update the application redirect URI
Update the Azure AD app registration with the URL https://<aro_public_hostname>/oauth2callback/Azure%20AD.
$ az ad app update --id $appId --reply-urls https://openshift.3a298ccfc966456481fe.westeurope.azmosa.io/oauth2callback/Azure%20AD
$ az ad app show --id $appId --query replyUrls -o json
[
  "https://openshift.3a298ccfc966456481fe.westeurope.azmosa.io/oauth2callback/Azure%20AD"
]
Access the cluster
To access our newly deployed ARO cluster and start working on it we have two main methods.
- OpenShift Console
- OpenShift CLI
OpenShift Console
From your favorite browser open the URL https://<aro_public_hostname> you will be prompted to login with your Azure AD user, use one of the ARO administrator accounts for this first login.

From here we can navigate to either Cluster Console, Application Console or Service Catalog which is the main landing page. I will not go in detail throughout all those sections since they are [perfectly detailed in OpenShift documentation.
OpenShift CLI
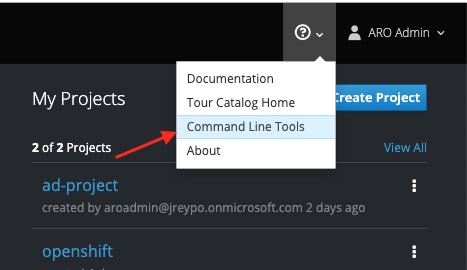
The OpenShift command line is oc, which is basically kuebctl with additional functionality for OpenShift. To get the oc tool access the Command Line Tools, the link can be found in the upper right part of the Service Catalog are as shown in the following screen capture.
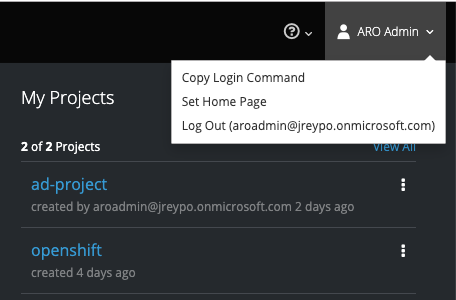
To login into our ARO cluster wiht oc we will use a token. Get your token again from the Service Catalog area in the upper right corner by clicking in your user name and then in Copy Login Command.
Paste the login command in your shell and execute it to log into the cluster.
$ oc login https://openshift.3a298ccfc966456481fe.westeurope.azmosa.io --token=bK2dcoYJuWgEGcwOJwuKOtdGMQf_zuUxYBwb_fsu394
Logged into "https://openshift.3a298ccfc966456481fe.westeurope.azmosa.io:443" as "aroadmin@jreypo.onmicrosoft.com" using the token provided.

You have access to the following projects and can switch between them with 'oc project <projectname>':

  * openshift

Using project "openshift".
$ oc get nodes
NAME                        STATUS   ROLES     AGE   VERSION
compute-1573691909-000000   Ready    compute   3d    v1.11.0+d4cacc0
compute-1573691909-000001   Ready    compute   3d    v1.11.0+d4cacc0
infra-1573691909-000000     Ready    infra     3d    v1.11.0+d4cacc0
infra-1573691909-000001     Ready    infra     3d    v1.11.0+d4cacc0
infra-1573691909-000002     Ready    infra     3d    v1.11.0+d4cacc0
master-000000               Ready    master    3d    v1.11.0+d4cacc0
master-000001               Ready    master    3d    v1.11.0+d4cacc0
master-000002               Ready    master    3d    v1.11.0+d4cacc0
And that’s it we can now start developing and deploying applications in out new shiny ARO cluster. In future posts posts I will show what kind of operations can be done in the cluster from the administrator perspective and will go deeper in ARO internals.
Comments are welcome. Take care!
–Juanma
Comments