
Deploying OpenStack with KVM and VMware NSX - Part 3: KVM hypervisor and Gluster storage setup
Welcome to the third post of my series about OpenStack. In the [first]{(% post_url 2014-04-29-deploying-openstack-with-kvm-and-vmware-nsx-part-1-nsx-overview-and-initial-setup %}) and second posts we saw in detail how to prepare the basic network infrastructure of our future OpenStack cloud using VMware NSX. In this third one we are going to install and configure the KVM compute host and the shared storage of the lab.
KVM setup
Create and install two CentOS 6.4 virtual machines with 2 vCPU, 2 GB of RAM, 2 network interfaces (E1000) and one 16GB disk. For the partitioning schema I have used the following one:
- sda1 - 512MB -
/boot - sda2 - Rest of the disk - LVM PV
lv_root- 13.5GB -/lv_swap- 2GB -swap
Mark Base and Standard groups to be installed and leave the rest unchecked. Set the hostname during the installation and leave the networking configuration with the default values. Please have in mind that you will need to have a DHCP server on your network, in my case I’m using the one that comes with VMware Fusion if you don’t have one then you will have to set here a temporary IP address in order to able to install the KVM software. Once the installation is done reboot your virtual machine and open a root SSH session to proceed with the rest of the configuration tasks.
Disable SELinux with setenfornce command, also modify SELinux config to disable it during OS boot. I do not recommend to disable SELinux in a production environment but for a lab it will simplify things.
setenforce 0
cp /etc/selinux/config /etc/selinux/config.orig
sed -i s/SELINUX\=enforcing/SELINUX\=disabled/ /etc/selinux/config
Check that hardware virtualization support is activated.
egrep -i 'vmx|svm' /proc/cpuinfo
Install KVM packages.
yum install kvm libvirt python-virtinst qemu-kvm
After installing a ton of dependencies and if t nothing failed enable and start the libvirtd service.
[root@kvm1 ~]# chkconfig libvirtd on
[root@kvm1 ~]# service libvirtd start
Starting libvirtd daemon:                                  [  OK  ]
[root@kvm1 ~]#
Verify that KVM has been correctly installed and it’s loaded and running on the system.
[root@kvm1 ~]# lsmod | grep kvm
kvm_intel              53484  0
kvm                   316506  1 kvm_intel
[root@kvm1 ~]#
[root@kvm1 ~]# virsh -c qemu:///system list
 Id    Name                           State
----------------------------------------------------

[root@kvm1 ~]#
Hypervisor networking setup
With KVM software installed and ready we can now move on to configure the networking for both hosts and integrate them into our NSX deployment.
Disable Network Manager for both interfaces. Edit /etc/sysconfig/network-scripts/ifcfg-ethX files and change NM_CONTROLLED value to no.
By default libvirt creates virbr0 network bridge to be used for the virtual machines to access the external network through a NAT connection. We need to disable it to ensure that bridge components of Open vSwitch can load without any errors.
virsh net-destroy default
virsh net-autostart --disable default
Install Open vSwitch
Copy the NSX OVS package to the KVM host and extract it.
[root@kvm1 nsx-ovs]# tar vxfz nsx-ovs-2.1.0-build33849-rhel64_x86_64.tar.gz
./
./nicira-flow-stats-exporter/
./nicira-flow-stats-exporter/nicira-flow-stats-exporter-4.1.0.32691-1.x86_64.rpm
./tcpdump-ovs-4.4.0.ovs2.1.0.33849-1.x86_64.rpm
./kmod-openvswitch-2.1.0.33849-1.el6.x86_64.rpm
./openvswitch-2.1.0.33849-1.x86_64.rpm
./nicira-ovs-hypervisor-node-2.1.0.33849-1.x86_64.rpm
./nicira-ovs-hypervisor-node-debuginfo-2.1.0.33849-1.x86_64.rpm
[root@kvm1 nsx-ovs]#
Install Open vSwitch packages.
rpm -Uvh kmod-openvswitch-2.1.0.33849-1.el6.x86_64.rpm
rpm -Uvh openvswitch-2.1.0.33849-1.x86_64.rpm
Verify that Open vSwitch service is enabled and start it.
[root@kvm1 ~]# chkconfig --list openvswitch
openvswitch     0:off   1:off   2:on    3:on    4:on    5:on    6:off
[root@kvm1 ~]#
[root@kvm1 ~]#
[root@kvm1 ~]# service openvswitch start
/etc/openvswitch/conf.db does not exist ... (warning).
Creating empty database /etc/openvswitch/conf.db           [  OK  ]
Starting ovsdb-server                                      [  OK  ]
Configuring Open vSwitch system IDs                        [  OK  ]
Inserting openvswitch module                               [  OK  ]
Starting ovs-vswitchd                                      [  OK  ]
Enabling remote OVSDB managers                             [  OK  ]
[root@kvm1 ~]#
Install nicira-ovs-hypervisor-node package, this utility provides the infrastructure for distributed routing on the hypervisor. With the installation the integration bridge br-int and OVS SSL credentials will be created.
[root@kvm1 ~]# rpm -Uvh nicira-ovs-hypervisor-node*.rpm
Preparing...                ########################################### [100%]
   1:nicira-ovs-hypervisor-n########################################### [ 50%]
   2:nicira-ovs-hypervisor-n########################################### [100%]
Running '/usr/sbin/ovs-integrate init'
successfully generated self-signed certificates..
successfully created the integration bridge..
[root@kvm1 ~]#
There are other packages like nicira-flow-stats-exporter and tcpdump-ovs but they are not needed for OVS functioning. We can proceed now with OVS configuration.
Configure Open vSwitch
The first step is to create OVS bridges for each network interface card of the hypervisor.
ovs-vsctl add-br br0
ovs-vsctl br-set-external-id br0 bridge-id br0
ovs-vsctl set Bridge br0 fail-mode=standalone
ovs-vsctl add-port br0 eth0
If you were logged in by an SSH session you have probably noticed that your connection is lost, this is because br0 interface has taken control of the networking of the host and it doesn’t have an IP address configured. To solve this access the host console and edit ifcfg-eth0 file and modify to look like this.
DEVICE=eth0
DEVICETYPE=ovs
TYPE=OVSPort
OVS_BRIDGE=br0
ONBOOT=yes
BOOTPROTO=none
IPV6INIT=no
NAME=eth0
HOTPLUG=no
HWADDR=00:0C:29:CA:34:FE
NM_CONTROLLED=no
Next create and edit ifcfg-br0 file.
DEVICE=br0
DEVICETYPE=ovs
TYPE=OVSBridge
ONBOOT=yes
BOOTPROTO=static
IPADDR=192.168.82.42
NETMASK=255.255.255.0
GATEWAY=192.168.82.2
IPV6INIT=no
HOTPLUG=no
Restart the network service and test the connection.
service network restart
Repeat all the above steps for the second network interface.
Finally configure NSX Controller Cluster as manager in Open vSwitch.
ovs-vsctl set-manager ssl:192.168.82.44
Execute ovs-vsctl show command to review OVS current configuration.
[root@kvm1 ~]# ovs-vsctl show
383c3f17-5c53-4992-be8e-6e9b195e51d8
    Manager "ssl:192.168.82.44"
    Bridge "br1"
        fail_mode: standalone
        Port "br1"
            Interface "br1"
                type: internal
        Port "eth1"
            Interface "eth1"
    Bridge "br0"
        fail_mode: standalone
        Port "eth0"
            Interface "eth0"
        Port "br0"
            Interface "br0"
                type: internal
    Bridge br-int
        fail_mode: secure
        Port br-int
            Interface br-int
                type: internal
    ovs_version: "2.1.0.33849"
[root@kvm1 ~]#
Register OVS in NSX Controller
With our OVS instance installed and running we can now inform NSX Controller of its existence either via NVP API or NSX Manager, in our case we will use the later.
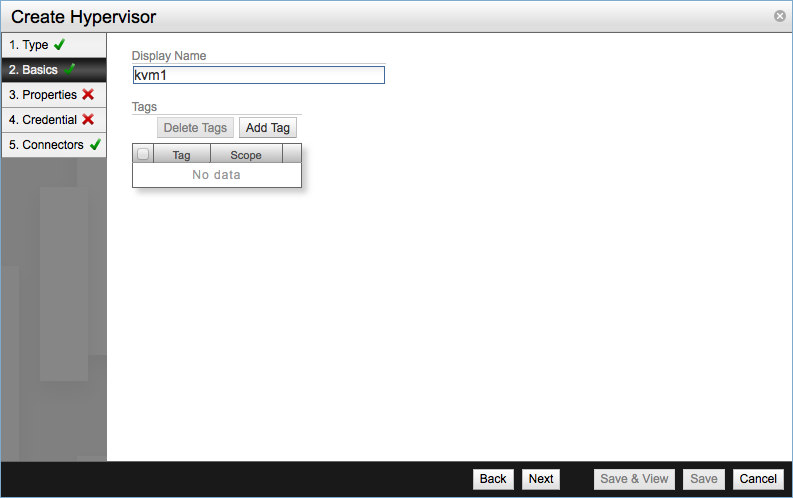
Log into NSX Manager as admin user and go to Dashboard, from Summary of Transport Components table click Add in the Hypervisors row. Verify that Hypervisor is selected as transport node and move to the Basics screen. Enter a name for the hypervisor, usually the hostname of the server.
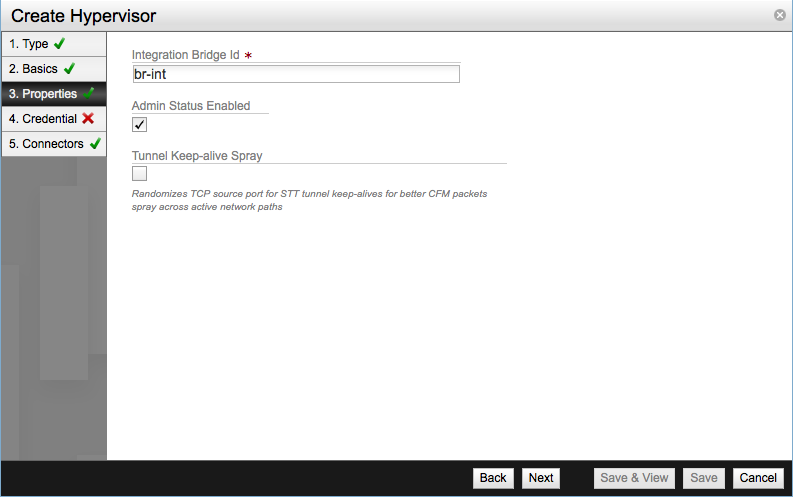
In Properties enter:
- Integration bridge ID, for us is
br-int. - Admin Status Enabled - Enabled by default.
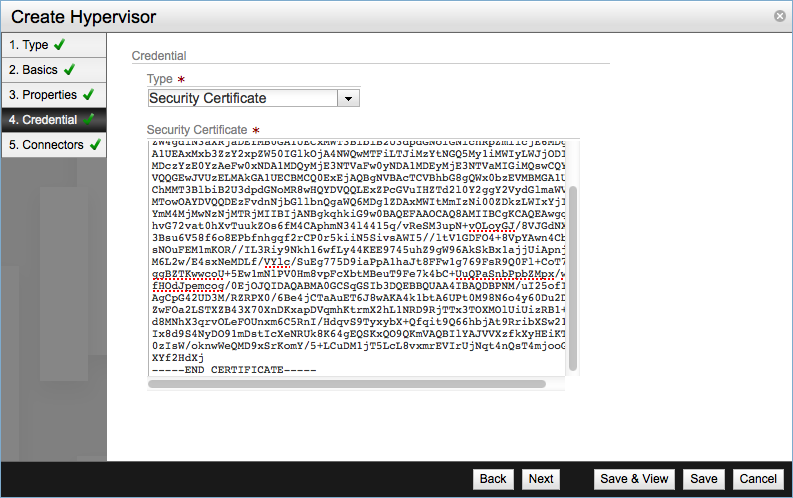
For the Credential screen we are going to need the SSL certificate that was created along with the integration bridge during the NSX OVS installation. The PEM certificate file is ovsclient-cert.pem and is in /etc/openvswitch directory.
[root@kvm1 ~]# cat /etc/openvswitch/ovsclient-cert.pem
-----BEGIN CERTIFICATE-----
MIIDwjCCAqoCCQDZUob5H9tzvjANBgkqhkiG9w0BAQUFADCBojELMAkGA1UEBhMC
VVMxCzAJBgNVBAgTAkNBMRIwEAYDVQQHEwlQYWxvIEFsdG8xFTATBgNVBAoTDE9w
ZW4gdlN3aXRjaDEfMB0GA1UECxMWT3BlbiB2U3dpdGNoIGNlcnRpZmllcjE6MDgG
A1UEAxMxb3ZzY2xpZW50IGlkOjA4NWQwMTFiLTJiMzYtNGQ5My1iMWIyLWJjODIz
MDczYzE0YzAeFw0xNDA1MDQyMjE3NTVaFw0yNDA1MDEyMjE3NTVaMIGiMQswCQYD
VQQGEwJVUzELMAkGA1UECBMCQ0ExEjAQBgNVBAcTCVBhbG8gQWx0bzEVMBMGA1UE
ChMMT3BlbiB2U3dpdGNoMR8wHQYDVQQLExZPcGVuIHZTd2l0Y2ggY2VydGlmaWVy
MTowOAYDVQQDEzFvdnNjbGllbnQgaWQ6MDg1ZDAxMWItMmIzNi00ZDkzLWIxYjIt
YmM4MjMwNzNjMTRjMIIBIjANBgkqhkiG9w0BAQEFAAOCAQ8AMIIBCgKCAQEAwgqT
hvG72vat0hXvTuukZOs6fM4CAphmN34l4415q/vReSM3upN+vOLoyGJ/8VJGdNXH
3Bsu6V58f6o8EPbfnhgqf2rCP0r5kiiN5SivsAWI5//ltV1GDFO4+8VpYAwn4Cbd
sNOuFEM1mKOR//IL3Riy9Nkh16wfLy44KEE9745uhZ9gW96AkSkBx1ajjUiApnjL
M6L2w/E4sxNeMDLf/VYlc/SuEg775D9iaPpA1haJt8FFw1g769FsR9Q0Fl+CoT7f
ggBZTKwwcoU+5Ew1mNlPV0Hm8vpFcXbtMBeuT9Fe7k4bC+UuQPaSnbPpbZMpx/wd
fHOdJpemcog/0EjOJQIDAQABMA0GCSqGSIb3DQEBBQUAA4IBAQDBPNM/uI25ofIl
AgCpG42UD3M/RZRPX0/6Be4jCTaAuET6J8wAKA4k1btA6UPt0M98N6o4y60Du2D+
ZwFOa2LSTXZB43X70XnDKxapDVqmhKtrmX2hL1NRD9RjTTx3TOXMOlUiUizRB1+L
d8MNhX3qrvOLeFOUnxm6C5RnI/HdqvS9TyxybX+Qfqit9Q66hbjAt9RribXSw21G
Ix8d9S4NyDO91mDstIcXeNRUk8K64gEQSKxQO9QKmVAQBIlYAJVVXzfkXyHEiKTe
0zIsW/oknwWeQMD9xSrKomY/5+LCuDM1jT5LcL8vxmrEVIrUjNqt4nQsT4mjooG+
XYf2HdXj
-----END CERTIFICATE-----
[root@kvm1 ~]#
Copy the contents of the file and paste them in the Security Certificate text box.
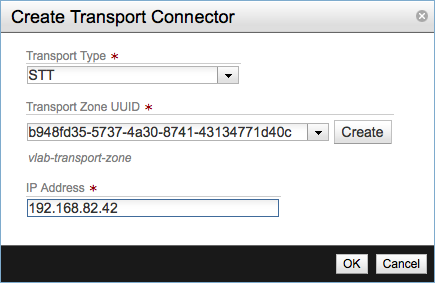
Finally add the Transport Connector with the values:
- Transport Type: STT
- Transport Zone UUID: The transport zone, in my case the UUID corresponding to vlab-transport-zone.
- IP Address - The address of the
br0interface of the host.
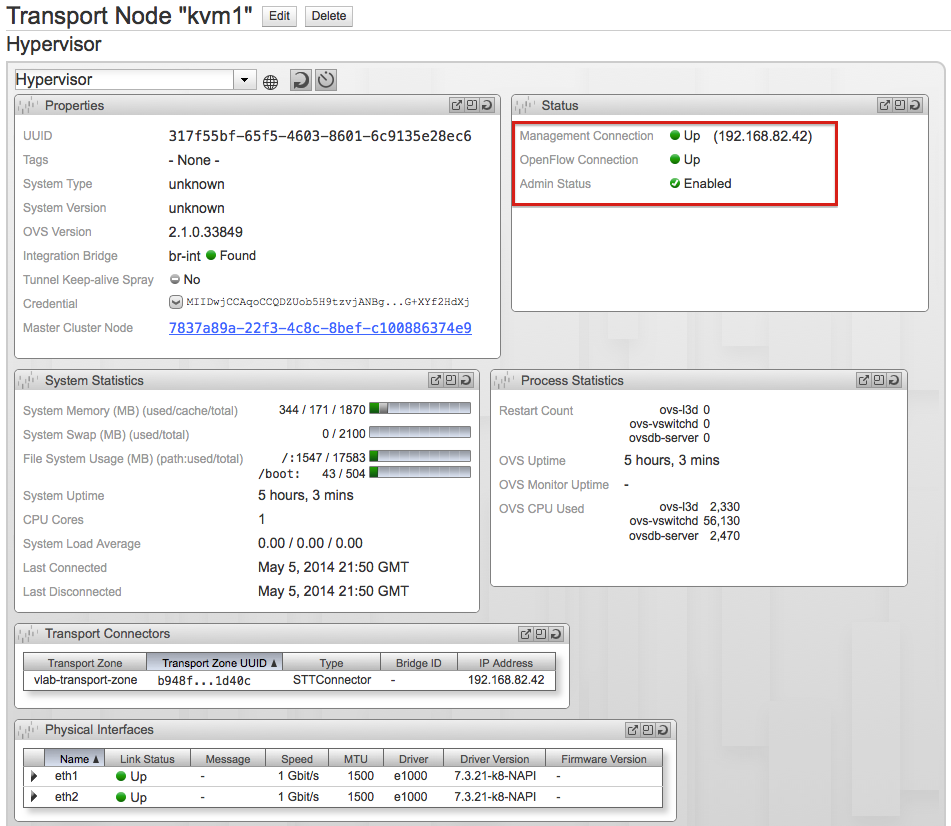
Click Save & View and check that Management and OpenFlow connections are up.
GlusterFS setup
I choose GlusterFS for my OpenStack lab for two reasons. I have used it in the past so this has been a good opportunity for me to refresh and enhance my rusty Gluster skills, and it’s supported as storage backend for Glance in OpenStack. Instead of going with CentOS again this time I choose Fedora 20 for my Gluster VM, a real world GlusterFS cluster will have at least two node but for our lab one will be enough.
Create a Fedora x64 virtual machine with 1 vCPU, 1GB of RAM and one network interface. For the storage part use the following:
- System disk: 16GB
- Data disk: 72GB
Use the same partitioning schema of the KVM hosts for the system disk. Choose a Minimal installation and add the Standard group. Configure the hostname and the IP address of the node, set the root password and create a user as administrator, I’m using here my personal user jrey.
Disable SELinux.
sudo setenforce 0
sudo cp /etc/selinux/config /etc/selinux/config.orig
sudo sed -i s/SELINUX\=enforcing/SELINUX\=disabled/ /etc/selinux/config
Stop and disable firewalld.
sudo systemctl disable firewalld.service
sudo systemctl stop firewalld.service
Install GlusterFS packages. There is no need to add any additional yum repository since Gluster is included in the standard Fedora repos.
sudo systemctl install glusterfs-server
Enable Gluster services.
sudo systemctl enable glusterd.service
sudo systemctl enable glusterfsd.service
Start Gluster services.
[jrey@gluster ~]$ sudo systemctl start glusterd.service
[jrey@gluster ~]$ sudo systemctl start glusterfsd.service
[jrey@gluster ~]$
[jrey@gluster ~]$ sudo systemctl status glusterd.service
glusterd.service - GlusterFS an clustered file-system server
   Loaded: loaded (/usr/lib/systemd/system/glusterd.service; enabled)
   Active: active (running) since Mon 2014-04-28 17:17:35 CEST; 20s ago
  Process: 1496 ExecStart=/usr/sbin/glusterd -p /run/glusterd.pid (code=exited, status=0/SUCCESS)
 Main PID: 1497 (glusterd)
   CGroup: /system.slice/glusterd.service
           └─1497 /usr/sbin/glusterd -p /run/glusterd.pid

Apr 28 17:17:35 gluster.vlab.local systemd[1]: Started GlusterFS an clustered file-system server.
[jrey@gluster ~]$
[jrey@gluster ~]$ sudo systemctl status glusterfsd.service
glusterfsd.service - GlusterFS brick processes (stopping only)
   Loaded: loaded (/usr/lib/systemd/system/glusterfsd.service; enabled)
   Active: active (exited) since Mon 2014-04-28 17:17:45 CEST; 15s ago
  Process: 1515 ExecStart=/bin/true (code=exited, status=0/SUCCESS)
 Main PID: 1515 (code=exited, status=0/SUCCESS)

Apr 28 17:17:45 gluster.vlab.local systemd[1]: Starting GlusterFS brick processes (stopping only)...
Apr 28 17:17:45 gluster.vlab.local systemd[1]: Started GlusterFS brick processes (stopping only).
[jrey@gluster ~]$
Since we are running a one-node cluster there is no need to add any node to the trusted pool. In case you decide to run a multi-node environment you can setup the pool by running the following command on each node of the cluster. .
gluster peer probe <IP_ADDRESS_OF_OTHER_NODE>
Edit the data disk with fdisk and create a single partition. Format the partition as XFS.
[jrey@gluster ~]$ sudo mkfs.xfs -i size=512 /dev/sdb1
meta-data=/dev/sdb1              isize=512    agcount=4, agsize=4718528 blks
         =                       sectsz=512   attr=2, projid32bit=0
data     =                       bsize=4096   blocks=18874112, imaxpct=25
         =                       sunit=0      swidth=0 blks
naming   =version 2              bsize=4096   ascii-ci=0
log      =internal log           bsize=4096   blocks=9215, version=2
         =                       sectsz=512   sunit=0 blks, lazy-count=1
realtime =none                   extsz=4096   blocks=0, rtextents=0
[jrey@gluster ~]$
Create the mount point for the new filesystem, mount the partition and edit /etc/fstab accordingly to make it persistent to reboots.
sudo mkdir -p /data/glance/
sudo mount /dev/sdb1 /data/glance
sudo mkdir -p /data/glance/brick1
sudo echo "/dev/sdb1 /data/glance xfs defaults 0 0" >> /etc/fstab
Create the Gluster volume and start it.
[jrey@gluster ~]$ sudo gluster volume create gv0 gluster.vlab.local:/data/glance/brick1
volume create: gv0: success: please start the volume to access data
[jrey@gluster ~]$
[jrey@gluster ~]$ sudo gluster volume start gv0
volume start: gv0: success
[jrey@gluster ~]$
[jrey@gluster ~]$ sudo gluster volume info

Volume Name: gv0
Type: Distribute
Volume ID: d1ad2d00-6210-4856-a5eb-26ddcba77a70
Status: Started
Number of Bricks: 1
Transport-type: tcp
Bricks:
Brick1: gluster.vlab.local:/data/glance/brick1
[jrey@gluster ~]$
The configuration of the Gluster node is finished. In the next article we will install and configure OpenStack using the different components detailed during current and previous parts of the series.
Please feel free to add any comment or correction.
Juanma.
Comments